
5 steps to showing a video in rural communities
Ready for a sneak peek into an important part of our Video Education Workshops?
As you may know, our four-day workshops are full-day intensive trainings on the creation and dissemination of educational videos. During those four days, we cover everything from turning on a camera to editing a video to displaying a video on a projector in a remote community without electricity.
The last of these modules — actually showing the video — is core to the training. This is when workshop attendees learn how to bring their message to life and ensure their audience is interested and ready to learn from the video.
So, how to accomplish a successful video showing? Below, we share a high-level overview of the five most important steps we share with local NGO partners on how to set up an effective — and fun — viewing for their completed videos.
1. Cover the windows to create a darkened viewing area
In many rural villages, windows don’t come with curtains. Projectors have become increasingly proficient in lighted areas, but they’re not televisions. Their portable nature serves well in places without access to electricity, but the tradeoff is needing a darkened area to show the video.
You’ll need to find a way to cover the windows, and there are several easy ways to do this.
A spring-loaded tension rod draped with a piece of light-blocking fabric is your easiest method. In many developing countries, tension rods are expensive or hard to come by. So a PVC pipe and some rubber bands are a more affordable and more easily obtainable option.

PVC pipe light cover

Light covers
Other options include:
Tacking or nailing fabric to the edges of the windows
Tucking a piece of cardboard, wood or light-blocking paper into the window; be sure to measure the size of the window before cutting
If you can project the video in the evenings, this will be less of a concern; but it’s often hard to gather communities at night because it’s harder to travel safely. Be prepared to show the video in the daylight, and get excited if you get an evening opportunity.
2. Locate–or create–a flat surface for your “screen”
You’ll need a bright, flat surface to display the video. In the evenings, the outside of a house or a wall works well, but if you’re indoors, you may need to get creative. If you have a windowless wall, this is often a good choice, but these are often difficult to find in community halls or other local gathering places.
In the absence of a portable projector screen, a thick white sheet or blanket is the best choice: Attach two strings on the top edges and hang across a wall. Anchor the bottom ends with rocks or heavy bricks, and pull all the edges taut.
3. Sound on: Extend your speakers
For a group of 25 to 50 people, you’ll need at least two speakers to ensure everybody can hear. In some cases, Bluetooth capabilities may allow you to send the signal without a cord, but the most reliable method is an auxiliary cable connected from the projector to the speaker. A cord splitter will allow you to plug into the jack and extend two cables.
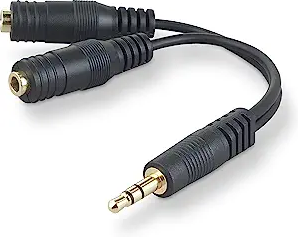
Cord Splitter
Be sure to test the sound beforehand to make sure you have the cable plugged into the right jack and that the volume is loud enough that everybody can hear the video.
Bonus tip: Put the speaker in a mug or bowl for extra sound carry.
4. Prepare your “trailers”: Show a cartoon
A video showing is a fairly uncommon event in most remote communities, so take the opportunity to really make this a fun event for the people attending. Begin the presentation with “trailers,” such as cartoons, to get people excited and ready for the main event. For some communities, this is the first time seeing such technology, and the video may be about something that kindly challenges traditional practices. For this reason, it’s important to begin the show with something that’s inviting, welcoming, and, most importantly, fun to gain their interest and willingness to listen to the educational video.
5. Engage the group during the video showing
Advances in projector technology mean most projectors now come with remote controls, a very helpful tool for engaging a group during a viewing. It’s easy to push play and let the video run, but we’re in the business of behavior change — and that means asking the group to participate throughout the video. This will require frequent pausing of the video at key points, asking related questions, and eliciting responses from the group.
For example, if you’re showing a video about the production of effective compost, such as we did in ACDI/VOCA — Honduras, perhaps you’d pause early on in the showing and inquire about current composting methods: What’s working? What’s not working? Demonstrating genuine interest and encouraging truthful responses shows the audience you’re invested in their experience without trying to disrupt their culture.
Before showing the video, watch it several times through and identify two to three timestamps you’ll want to pause at. Also, jot down a few open-ended questions to accompany each stop. At the end of the video, be prepared to play it again if requested.
Most importantly, be sure to save some time for Q&A at the end. Some of the techniques and instructions you’ll be showing on the video may be very new and be met with some resistance, So be ready to answer with calm, informative answers.
Some groups may also be shy, so come prepared with a handful of questions if nobody’s asking anything. Ensure they’re open-ended, and consider calling upon some of the most engaged in the group to answer, even if they don’t raise their hands.
Questions might include:
Did you learn anything new from the video?
What did you think of __ in the video?
Was there anything that surprised you?
We hope you found this overview enlightening. If you’d like to learn more about what our trainings entail, please reach out to info@illuminaid.org.